Nobody thinks about their car seats until something goes wrong. You spill coffee on a Monday morning and wipe it with a tissue, telling yourself you’ll “properly clean it later.” Three weeks pass. Now it’s a stain. Your friend gets in the car, glances at the seat, says nothing, but you notice.
Here’s the thing, though: cleaning car seats is not too hard. People either ignore it for too long or panic and use the wrong stuff, which only makes it worse. This guide will help you learn how to clean car seats like a pro.
Dirty seats are more than just ugly
Most people think seat cleaning is about looks. It’s not only that.
Think about how much time you spend in your car. Every drive, you’re sweating slightly, even in winter. Food crumbs fall into the seams. Dust settles into the fabric. If you live somewhere humid, all that trapped moisture in your seat padding is basically an invitation for mould to grow. You won’t see it at first. But eventually you’ll smell it, that weird musty odour that air fresheners can’t fix, no matter how many you hang.
There’s also the money angle. If you ever plan to sell your car, the interior is one of the first things buyers judge. A clean seat tells someone the car was looked after. A stained, smelly one, even if the engine runs perfectly, knocks hundreds off what people are willing to pay. It’s unfair, but it’s true. And beyond all that, honestly, sitting in a clean car just puts you in a better mood. It’s a small thing, but it matters.
Before you start, get your stuff together
One mistake people make is starting the cleaning and then realising halfway through that they need something else. Stop, get everything first, then begin. For fabric seats, a vacuum cleaner with a narrow attachment, a few microfiber cloths, a soft brush, an upholstery cleaner, and a spray bottle. Grab some baking soda, too, if you have it. For leather seats, a leather cleaner, a leather conditioner, and soft cloths. That’s it. You don’t need a trolley full of products.
Before you use any cleaner on your seats, test it in a hidden spot, the underside of the seat, a low edge, or anywhere out of sight. Some products react badly with certain seat materials or dye colours. Thirty seconds of testing can save you from ruining a seat.
Cleaning fabric seats step by step
Vacuum before you do anything else
If you spray cleaner onto a seat that still has crumbs and dirt sitting in it, you’re just making muddy soup. Get the vacuum in the surface, seams, and the gap between the seat and backrest. That gap collects disgusting amounts of stuff. Take your time with it.
Go easy with the cleaner
Spray a light coat of upholstery cleaner across the seat. Light. This is where so many people go wrong; they absolutely drench the seat, thinking more product means better results. It doesn’t. Soaking a fabric seat pushes moisture down into the padding underneath, and that padding takes ages to dry. If it doesn’t dry properly, mould starts growing in there, and then you’ve got a much bigger problem than the original stain.
Scrub gently with a soft brush
Circular motions, soft pressure. You’re trying to loosen the dirt from the fabric fibres, not scrub them off. If you’re pressing hard, stop; you’ll damage the material. The cleaner does the actual work. You’re just helping it along.
Blot with a microfiber cloth, don’t rub
There’s a difference between blotting and rubbing, and it matters. Rubbing spreads the dirt sideways and pushes it back into the fabric. Blotting lifts it out. Press the cloth down firmly, lift, move to a clean section, repeat. Follow up with a dry cloth to pull out as much moisture as you can.
Leave the doors open and let it dry
Don’t close the car up after cleaning. Leave the windows down, the doors open, and let the air move through. A seat that feels slightly damp will develop a smell if you trap it in a closed car overnight. Give it a few hours at least before you call it done.
Quick tip on odours: Before you even start vacuuming, sprinkle baking soda on the seats and let it sit for 20 minutes, or overnight if possible. It pulls odours out of the fabric. Vacuum it off, then follow the steps above. Makes a noticeable difference, especially in older cars or those that have had pets.
Cleaning leather seats – it’s easier to damage leather than you think
Leather looks tough and durable. And it is if you treat it properly. Use the wrong product on it once, and you’ll start noticing it drying out, fading, or cracking within months.
The biggest mistake people make with leather is grabbing whatever cleaning spray is nearby. Multi-surface cleaners, anything with bleach or ammonia, and even some baby wipes strip the leather of its natural oils. Once that happens, the material dries out and starts cracking, and there’s not much you can do to reverse serious damage.
Vacuum it first
Any grit or debris sitting on the surface will scratch the leather the moment you drag a cloth across it. Quick vacuum with a soft brush attachment, done.
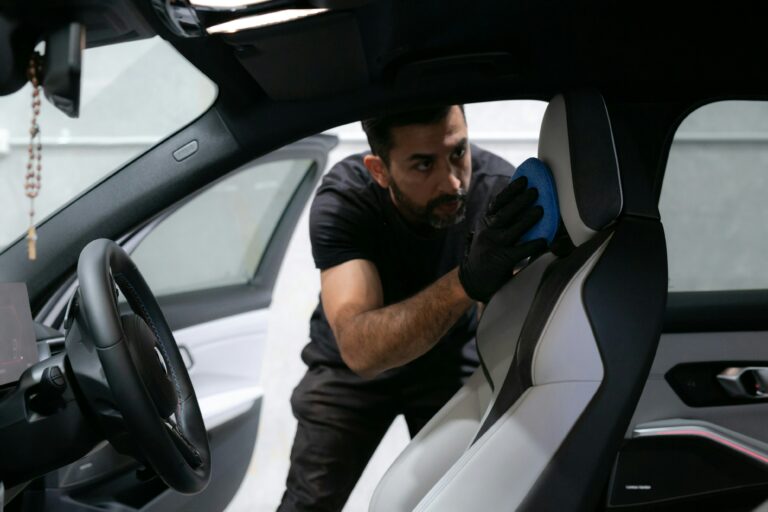
Use a proper leather cleaner, applied to the cloth, not the seat
Wipe gently in even strokes. No hard scrubbing, no soaking. You’re cleaning the surface, not stripping it. Less moisture is better with leather, always.
Condition it after every clean
This is the step that most people skip, and it’s honestly the most important one. Conditioner puts moisture back into the leather and keeps it from drying out and cracking. People with leather seats that still look great after five or six years, this is their secret. It takes five minutes. Apply a small amount to a cloth, work it in evenly, and buff lightly. Do it every three to four months, not just after a big clean.
Don’t clean leather in a hot car or direct sunlight. The heat makes the leather absorb products unevenly, and you can end up with patchy, strange-looking results. Find some shade or do it indoors.
Specific stains: what actually works
Act fast. That’s rule one with any stain. A spill you deal with in the first few minutes takes five minutes to clean. The same spill left to dry overnight is a completely different job, and might not fully come out at all.
Coffee- Blot up as much liquid as you can immediately. Then, a small amount of mild dish soap mixed with warm water was dabbed into the stain with a cloth. Work from the outside edge inward so you don’t spread it. Blot clean, repeat if needed.
Food grease- Upholstery cleaner or diluted dish soap. Apply, let it sit for sixty seconds to break down the grease, then blot it out. Don’t rub; grease stains spread fast when you rub them.
Ink- Rubbing alcohol on a cotton ball, dabbed carefully onto the mark. Be patient with this one. Multiple light passes work far better than one aggressive attempt. The moment you start scrubbing, the ink spreads, and it’s game over.
Pet smell- Baking soda, left on overnight if the smell is bad, then vacuumed off thoroughly. For serious pet odor that’s really soaked in, you need an enzyme cleaner, not an air freshener, not a fabric spray. Those just cover the smell temporarily. An enzyme cleaner actually breaks down the molecules that cause the odour at a molecular level. It’s the only thing that genuinely works on deeply embedded pet smells.
Mistakes people make
Using too much water or cleaner. Already covered this, but it keeps coming up because it keeps happening. Wet padding = mould risk. Always use less than you think you need.
Grabbing whatever cleaner is nearby. Kitchen spray, bathroom cleaner, random multipurpose stuff, these aren’t formulated for car upholstery. On leather, especially, the damage shows up quickly.
Scrubbing a stubborn stain harder. The instinct to put more effort in makes sense, but it backfires. You either damage the fabric fibres or push the stain deeper or spread it wider. If something isn’t coming out with gentle treatment, the product needs to sit longer, not your arm to work harder.
Closing the car up before the seats are actually dry. Even seats that feel dry on top can still be holding moisture underneath. Trap that moisture in a closed car, and within a day, you’ll have a smell developing. Always ventilate properly after a clean.
Habits that keep your car seats in good shape
Vacuum the seats weekly, even when they look fine. You’re removing the buildup before it has time to settle and become a problem. Clean spills the moment they happen, not later. Use seat covers if you have kids or pets, or if you regularly eat in the car. Park in shade when you can; UV exposure fades and dries out both fabric and leather faster than most people expect. Condition leather every few months, whether it looks like it needs it or not.
That’s genuinely all it takes. Five minutes a week and quick action on spills will do more for your seats than a deep clean every six months ever could.
When it’s time to call a professional
Some things are just beyond what you can fix at home, and knowing that saves you a lot of wasted time and frustration.
Smoke smell that’s settled into every surface of the interior. Flood damage: the seat padding was completely soaked and may be mouldy underneath. Stains that have been sitting for months. Mould that’s already established. Interiors that have been completely neglected for years. These situations need proper equipment and professional-grade products, not another round of upholstery spray and a microfiber cloth.
If your car is in that territory, professional detailing is worth every cent. A good detailer can restore seats and eliminate odours that no amount of DIY effort will touch. Especially if you’re preparing the car for sale, it’s one of the highest-return investments you can make before listing.
Conclusion
Fabric and leather need different products; that’s the main thing to understand. Beyond that, it’s just following the right steps, not rushing, and not drowning your seats in liquid.
Build a simple routine, deal with spills immediately, and do a proper clean every couple of months. Your seats will last longer, your car will smell better, and you’ll stop wincing every time someone opens the passenger door.
And if things have genuinely gotten out of hand, calling a professional is a wise option.